Toys As Learning Tools 2: Lego!
Using Toys As Learning Tools 2:
Using Lego To Learn Notated Rhythm

Notes on the page look all the same size or very nearly. Different notes – solid, with a hole in, with or without a stem, for example – indicate for how many beats to hold notes but the lengths aren’t shown on the page, other than very approximately in the amount of space following each note:

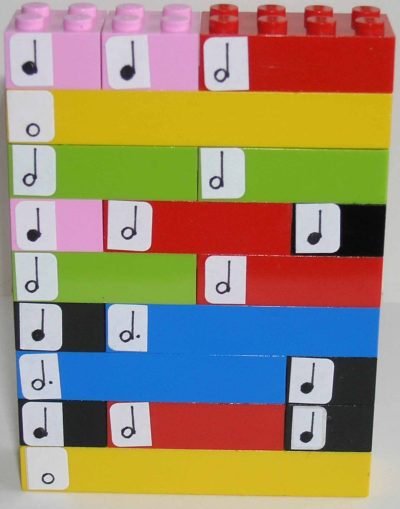
To make this easier for children to learn, I use Lego* bricks – different-sized bricks for different lengths of note ie.
2×2 bricks = crotchets (quarter notes),
2×4 bricks = minims (half notes),
2×6 bricks = dotted minims (dotted half notes) and
2×8 bricks = semibreves (whole notes).
Each brick has a label on the left-hand end showing the corresponding note symbol.
I ask pupils to play one note for each brick, initially only using 2×2 (crotchet) bricks. When they have also been introduced to 2×3 (minim) bricks, they can then put the bricks in a line in any order and play the rhythms, associating the symbols on the labels with the lengths of the bricks. When first playing 2×3 bricks, children sometimes play two notes instead of holding one note for twice as long, but they usually learn quickly if I demonstrate.
Children also enjoy being the teacher ie. I ask them to spot my (deliberate) mistakes in playing their rhythms, which they’re usually good at.

Later, children can be introduced to 2×6 and 2×8 bricks and make their own rhythms including those too. I’ve had pupils who’ve made small brick walls with Lego then played the rhythm of the wall from top to bottom (or bottom to top). One pupil even quickly used the bricks to make a helicopter with two 2×8 bricks crossed at the top and played the rhythm of those bricks to his mother, which he did very well.
(It doesn’t seem to cause any confusion using different-coloured bricks of the same length.)
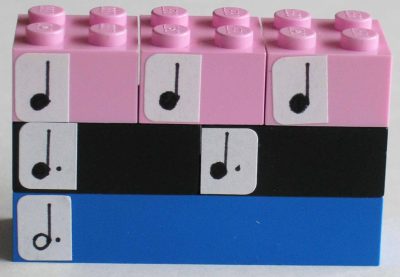
As pupils become more advanced, they can also use 1×2 bricks as quavers (eighth notes) and 3×2 bricks as dotted crotchets (dotted quarter notes).

Another use of Lego is to help pupils to understand bar-lengths, rests and ties. For these I have a large baseboard onto which I put flat plates (purple in the above photograph) to represent bar-lines, with a time signature at the beginning of each row. Pupils then affix the bricks to the board – if they try to put too many beats in a bar the bricks physically won’t fit; too few beats and there’s an obvious gap. Deliberate gaps can be left as rests.
Ties can be learnt using either wheel arches, as they are curved like ties on the page, or by using differing lengths of flat plates. Pupils can then physically connect bricks in the same way that they will connect notes when they play.

It also works well to use bricks to show the difference between simple and compound time – for example, three 2×2 bricks can be placed on top of two 2×3 bricks; the total length of both is the same but it makes obvious the different groupings.
I’ve not yet met a child who doesn’t like Lego so I find it very helpful to use it as a tool to help children understand rhythm and how it is notated.
*I have no connection to the Lego company.
Other bricks would work equally well provided that they are in the same proportions as the note values. Strips of card would also work but I suggest that if they are used at the piano, they need to be thick enough so that they can’t slip down between the keys.